
Wi-Fi extenders can be great useful devices for expanding wireless coverage in the home, but the information on how to set them up can be confusing for newer users. You might have seen one person using a browser, another using an app on their phone. And what’s all this about just pushing a button and getting it all connected to a router is a few seconds?
That’s why in this guide we’re going to give an overview of the 3 main ways you can connect a Wi-Fi extender to your router and start using it to browse the internet:
- WPS setup (pushing a button)
- Browser setup (logging into the extender)
- App setup (using a Tether App on your phone)
These methods all get you to the same end result (connecting your extender to your router, and then setting up your extender so it can be used as it’s own access point). But some methods (WPS) are designed to just be easy, quick and no nonsense, whereas other methods (browser, app) are more in depth, take a bit longer and allow more customization.
We’ll provide overview steps for each method, and also link to our specific guides we’ve produced for each setup/connection method, so you can get more detailed instructions if you want.
Let’s get started.
Method #1 – Connect Using WPS (Easiest, Quickest Method)
If you’ve got physical access to your router and really don’t want to be messing around with any complex setup or use any computers, this is the best way to connect an extender to a router. There’s only the push of a button needed, and it automatically syncs the two devices up.
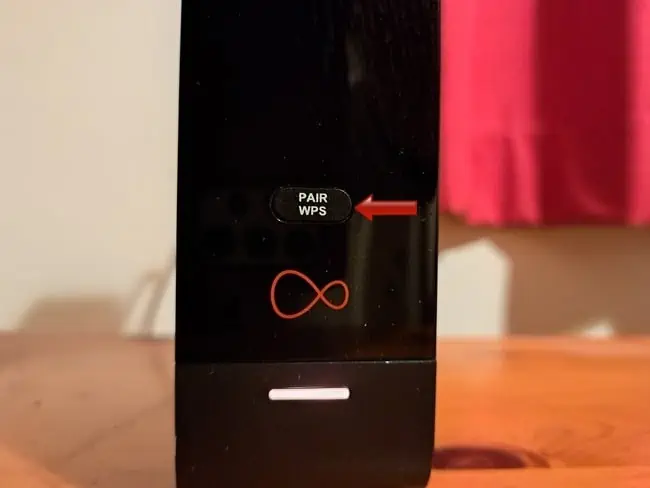
Newer routers have a Wi-Fi Protected Setup or WPS/Pair button, something like this:
Or it might have the two arrows in a circle symbol:
![]()
However, it’s labelled, this is the button you need to use, along with the Pair/WPS/Wi-Fi button on your extender (this is usually the only button on it anyway).
Here are the general steps:
Step #1 – Find and push the WPS button on your router, until it starts blinking. This means your router is now scanning for nearby devices which also have a WPS/Pair feature enabled. While you’re at the router, also note down it’s Wireless password if you don’t know it by memory.
Step #2 – Push the WPS/Pair/Wi-Fi button on your extender, and hold until it also starts blinking and flashing. This too is now scanning for nearby devices with WPS search enabled.
Step #3 – Wait for up to 2 minutes for the devices to “find” each other via their WPS scans. Sometimes, the lights will start to blink more slowly as setup nears completion. Once the LED on your extender stops blinking and turns solid green, the two devices are connected and it’s working.
Step #4 – Your extender is now ready to connect devices to, and browse the internet. When using WPS setup, by default it will clone your router’s SSID, but with a little “EXT” or “EXTENDER” suffix on the end (eg. Verizon-45677-EXT), and the password is exactly the same as your main router.
Video demo (WPS Setup)
See our full guide on WPS pairing of extenders and routers, for more detailed steps with screenshots
Method #2 – Connect Using A Browser (Laptop/PC/Phone)
This is the method I personally prefer as it allows more customization than WPS, which largely picks the settings for you. It takes a little bit longer, but isn’t hard. You just need any device with a browser to hand, and to know your router’s wireless password.
Here are the steps:
Step #1 – Note down the access details of your extender on the label on the back (SSID, username, password, default URL login), as you’ll need them in later steps.
Step #2 – Plug in your router, find it’s network on your Wi-Fi list, click on it and connect. When in it’s default state, it’ll be a really obvious name (eg. TP-Link-Extender), and it’ll be an open network, so no password is needed to connect.
Step #3 – Once connected, open up a web browser on the same device, and type in the default login URL you noted down into the address bar (eg. http://tplinkrepeater.net). Then enter the username/password you noted down as well:
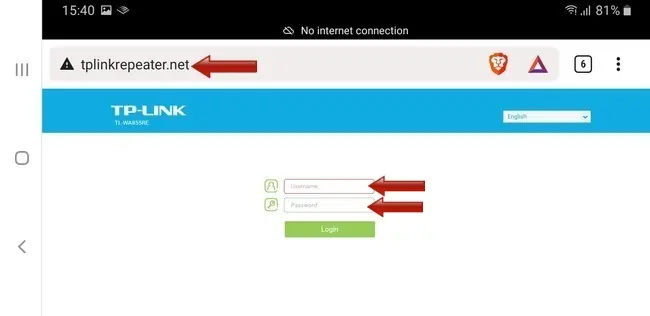
Step #4 – You should now be logged into the repeater’s admin panel, and from there you can run through the initial setup steps. Firstly, set a new admin username and password and confirm.
Step #5 – A list of nearby networks should appear within the extender’s setup panel. Find and click on your main host router, and enter it’s wireless password. Then run through the next screen, which usually allows you to use the custom SSID it’s set for you (eg. Comcast-4567-EXT), or set a new one for the repeater. The Wi-Fi password is always copied from your main router. Click Confirm/Save to save settings when happy, and then wait up to 2 minutes. A solid green light on your extender indicates it’s all been connected.
Step #6 – Once the connection steps are complete, you then have to connect your device to the extender’s new network you just set up, by finding it’s newly created SSID (eg. ATT-12345-EXTENDER) on your network list, and punching in the same wireless password as your main router, to connect. Sometimes, you have to do this before you can fully confirm/finish the setup within the extender, so do this, and click Confirm/Finish, and then log out of the extender’s admin panel, and you’re all done.
You’re now accessing the internet via your extender, which is in turn pulling it’s signal from your main router.
See here for our complete guide on setting up an extender via a browser on any device (PC/laptop/phone/tablet), for more detailed steps, with screenshots.
Method #3 – Connect Using An App (Phone)
This is a lesser used method, as there really only seems to be a Tethering App for TP Link Wi-Fi extenders, but it’s there as an option if you’ve only got a phone to hand and don’t want to do browser or WPS setup.

Here are the steps:
Step #1 – Find the Tethering App on your phone’s App store (here’s a link to the TP Link one that’ll be most commonly used), and install it.
Step #2 – Create an account within the app (email/password) and confirm the code/link sent to your email to activate your account on the app.
Step #3 – Connect your phone to the extender, by finding it’s default SSID (eg. TP-Link-Extender) on your network list and clicking on it to connect (no password needed for brand new extenders in their default state).
Step #4 – Create a new admin username/password for your extender (changing them away from the defaults on the label) and confirm.
Step #5 – Select your main router from the network list that appears in the app, and enter it’s Wi-Fi password to connect (2.4 GHz is fine if it’s dual band). Wait a few minutes for the devices to connect. A next screen shows the new extender network that has been created, with it’s own SSID that’s the same as your router with a little “EXT” or “EXTENDER” suffix on the end. It also copies your router’s Wi-Fi password. Confirm or edit the extender’s SSID as required, and Save settings to progress.
Step #6 – Connect to your extender by finding the newly created SSID on your network list, and entering the same wireless password as your router, to connect. You’re now accessing the internet via your extender, which is in turn pulling it’s signal from the main host router.
See our full guide on settings up an extender using a Tethering App on your phone, for more detailed steps.
What If The Extender Setup Isn’t Working?
Setting Up A Wi-Fi Extender doesn’t always work first time, and sometimes there are problems, but they can usually be fixed pretty easily.
Here are some common things to make sure of:
- Make sure the extender is within range of the router and device, and is consistently emitting a signal that your device can pick up.
- If the extender has been used, be sure to factory reset it as it will retain previous settings. Push a pin into the reset hole to do this.
- Make sure all usernames/passwords are entered correct, including case sensitive.
- If using a browser, be sure to clear browser cache or switch to HTTP if you’re getting a “connection refused” error
- Use a different method other than the one you’ve tried (WPS is quickest/easiest, browser set up is the most in depth and allows the most customization).
- When doing browser setup, be sure to actually connect to the extender’s newly created network and confirm to fully complete the setup (this is required on some models).
- If you don’t know your Wi-Fi router’s password, you’ll need to factory reset that to restore the defaults on the label. You will need to know your router’s wireless password to use an extender with it.
See our full troubleshooting guide if struggling to set up a Wi-Fi extender, for more detailed tips.
