We’ve already covered how to link up a Wi-Fi extender with your router using the two main methods – the WPS/Pair button and using a browser on your laptop/PC (can also use this method on a browser on your phone as well). But some more modern extenders also allow you set it up using a Pair/Tethering App on your phone, which is what we’ll cover in this quick guide, so all the main connection methods are covered.
Honestly, I think the WPS/browser methods are easier and quicker, but this method is also there if you want it, and can come in useful if you only have a phone to hand.
Here are the quick steps.
- Find the Tethering app for your brand of extender
- Create a profile using the app
- Find your extender on the Wi-Fi network list
- Connect and it will be added to your tethering app
- Create new admin login credentials (username/password)
- Select your router on the network list
- Enter the router Wi-Fi password.
- Modify the extender’s SSID if desired
- Tap Save/Apply/Finish to complete setup
- Your extender is now connected to the router and ready to use.
Now let’s cover more detailed steps.
Preliminary Step – Reset Extender if needed
If your extender is brand new, you don’t need to worry about this. But if you’re using a second hand Wi-Fi extender, it may have the previous user’s custom settings stored on it. To avoid and confusion in this regard before you set it up, it’s best to factory reset the extender, to revert all credentials back to the defaults on the label.
Push a pin or other sharp object into the reset hole on the extender, and wait a few seconds until the LED blinks or goes out. Then wait a minute or two for the extender to fully reset and wipe all previous settings. Everything’s now restored to default, like when it was new, and you can go ahead with the main setup.
Step #1 – Find & Install Tethering App On Your Phone
Firstly, if it’s not already on your phone, you need to find and install the Tethering/Pairing app for your brand of extender, which should be found it the Google Play Store or Apple Store or similar.
To help with this, here are links to apps for some popular range extender brands:
- TP Link Tethering App
- General Extender Tethering/Setup App #1
- General Extender Tethering/Setup App #2
The generic apps should work with some brands at least. Honestly, it seems to only be TP Link that have built an app specifically for this out of the major brands. With other brands, you’re better using WPS or laptop browser setup.
Step #2 – Create a Profile On The Tethering App
Once you’ve downloaded and installed the Tethering App on your phone, you’ll need to set up an account on it if you don’t have one already. Follow the steps to set up a profile – enter an email and password, confirm with the code/link sent to your email on the same device, and you should now have an active account with that extender provider on the app.
Be sure to log into this app on your phone, to proceed with the next step.
Step #3 – Connect Your Phone To Your Extender
If you load up the app without connecting to the extender, it will display “no networks found” or something similar. To add a network to it’s list, you need to connect the same phone to the extender.
You do this by finding the extender’s network/SSID on your Wi-Fi list on your device, and clicking on it to connect. If it’s brand new or has been reset, it’s network name will be really obvious (eg. TP-Link-Extender-60A3), and it’s network will be open, so no password will be needed to connect the first time.
Just click on it to connect. Then refresh and network/devices page on your app, and the extender should now show, as long as you’ve done it all on the same device. Confirm/accept the extender within the app.
Step #4 – Create New Admin Login Credentials For The Extender
The first thing extender setup guides do is to make you configure a new admin username/password to access the extender settings (it’s the same with browser/laptop setup).
Click on the extender within the app’s Devices/Network menu, and it’ll take you to a page where you set new access credentials away from the defaults listed on the label, for better security.
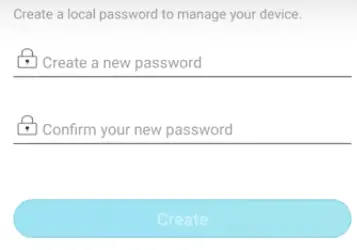
Note this is for the access credentials, where you log into the admin/configuration/settings panel of the extender to manage it’s settings, not for Wi-Fi access, which comes in the next few steps.
Set a new username and password, and save settings, and be sure to remember them, as if you forget them, you’ll have to factory reset the extender to regain access.
Step #5 – Connect To The Main Router
Next, you need to connect the extender to your host router within the app. It’s usually pretty easy – a list of nearby networks should appear, and you just need to select your router on the list.
If your extender and router are both 5 GHz enabled, you may also need to choose between 2.4 GHz and 5 GHz networks, but for most users, 2.4 GHz is fine – just connect to that one.
Enter your router’s Wi-Fi password in the app’s interface, and then wait for it to fully tether and connect.
A screen then comes up showing your router’s initial network and password, plus the extender’s newly created network and password (which automatically copies your router’s password).
The extender is usually the same SSID as your router, just with a little suffix on the end like “EXT” or “EXTENDER” to differentiate it. If you want, you can modify the extender’s SSID/network name in the app to something different (eg. Bobs-Extender)
Once you’re happy with everything, click Confirm/Save/Accept to save the settings and finish the setup. It might take a minute or two to fully initialize.
Step #6 – Connect To Your Extender
Once it’s done, your extender is now ready to use, with it’s own network that’s hopefully a boosted and stronger version of your host router’s network in the “dead-zones” where it’s needed.
You extender should now appear as it’s own network on your network list on any nearby device (eg “Comcast-A45608-Extender”, unless you set it differently), and you just click on it and enter the same password as your main router to connect. That’s it! You’re now browsing through your extender’s network, which in turn is pulling it’s signal from your host router. Happy surfing!
What If I Can’t Get The App Setup To Work?
If for whatever reason, the app setup isn’t working, you’re best resorting to one of the other more common setup methods, like WPS or browser/laptop setup, which we’ve also covered in depth on this site.
If you have physical access to your host router, WPS is the easiest and quickest method and doesn’t require any complex setup.
If you don’t know your main router’s password, you’ll have to factory reset it to revert the password to the default on the label. Same for the extender if you don’t know any credentials on that as well. Regardless of the setup method used, you will at some point need to know and use your host router’s password to connect the extender to the router, and then connect to the extender itself once configured.
