
Wi-Fi extenders can be a great way of extending coverage and a working signal/connection to “dead-zones” in the home, but it’s also true that bandwidth on these can be limited.
When you check who’s connected to it, you don’t want to see other users in the home hogging bandwidth on the extender’s network, or neighbors hacking your extender and using it without your permission.
Unfortunately, at least within the home, access control is not so easy with a Wi-Fi extender as on main routers, since they by default copy or clone the same wireless password as your main router, so they’re easy to connect to as long as someone in the home already knows your main router password.
In this guide, we’ll give simple steps on how to kick devices off your Wi-Fi extender’s network, and also restrict access going forward so you can control bandwidth and general usage.
Here are very simple steps:
- Open a browser on any device connected to the extender
- Type in the access URL and admin username/password
- Find the Clients tab to view connected devices
- Click Remove or Block to kick devices the network
Let’s cover them in more detail.
Finding Which Devices Are Connected To Your Extender
Before you kick devices off your repeater’s network, you first need to find them within the extender’s settings/admin panel. This is pretty easy; here are the steps:
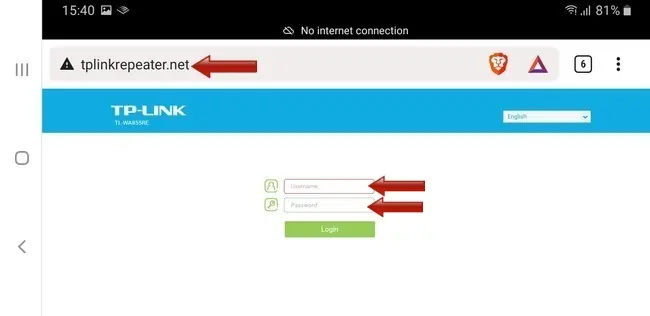
Step #1 – Open up any browser on any device already connected to the extender’s network, and type in the access/login URL into the browser address bar. Here are some common ones for different brands:
- TP Link – http://tplinkrepeater.net
- Netgear – http://mywifiext.net
- Linksys – http://extender.linksys.com
- Wavlink – http://wifi.wavlink.com
Then enter the admin username/password in the boxes that come up to enter the extender’s settings panel. The default ones for these are on the device label, but if you’ve already configured the extender, you’ll have set your own custom values for these that you’ll hopefully remember. If you forgot them, you’ll need to factory reset the device to start over.
Step #2 – Once inside the extender settings, sometimes the connected devices might display right there on the front page. On other models, you might need to click on a Devices or Clients tab to bring them up:
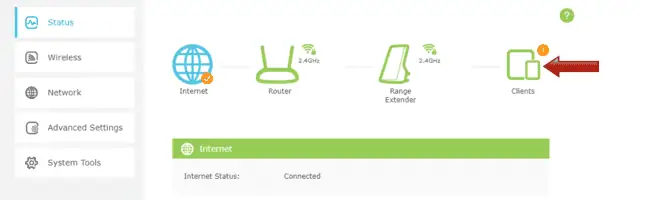
A list of devices by MAC address, name and IP address should appear. You’re now ready to start kicking off the ones you don’t want!
Devices are usually easy to identify by their name/MAC, but see this definitive guide to finding the MAC address for any device to sort out which device belongs to who so you can block one you don’t want using the extender.
Option #1 – Use The Block or Remove Feature
On most newer extender models, right next to each device on the device list, there will be a Block or Remove option that you can click on to kick a device off the extender’s network right there and then.
This might block that device permanently anyway, or you might need to resort to some Access Control/MAC Filtering, which we’ll cover now.
Option #2 – Blacklist Access Control (Less Strict)
For more robust and permanent access control, you might want to specifically use the Access Control or MAC Filtering options within the extender settings.
There will usually be an Access Control or Filtering menu, itself often under the Advanced or Wireless or Security tab or similar. It will vary with different extender brands/models, but shouldn’t be too hard to find.
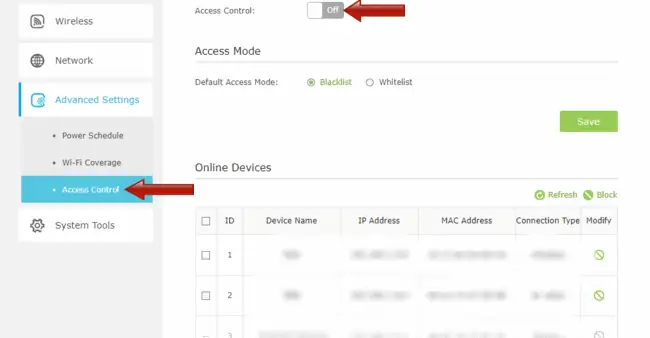
Once you find it, enable it if required, and then decide whether you’re going to do it via a Whitelist or Blacklist, and select/toggle on the option you need.
Blacklist access control lets you decide only the specific devices that will be blocked from accessing the extender’s network going forward. So you enter their MAC address into the Blacklist and Save/Confirm and from then on those devices (but ONLY those devices) cannot now access the Wi-Fi extender’s network, even if they enter the correct password. But all other devices not on this list can still connect with the correct password.
This is good if you’ve got one or two known, pesky devices within the home who keep connecting to the extender and hogging bandwidth, and you want to kick them off.
Option #3 – Whitelist Access Control (More Strict)
Whitelist filtering is a more strict criteria, whereby you determine the only devices that will be allowed on the extender’s network.
To do this, enable the Whitelist feature, and add devices by MAC address to this list and confirm/save. From then on, ONLY these devices can connect to the Wi-Fi extender’s network, and all other devices not on this list cannot ever connect, even with the correct password.
This is good if you really only want a couple of approved devices to ever be allowed on the extender’s network, and you want all other devices by elimination to be kicked and blocked going forward.
Additional Security Tips For An Extender’s Network
Here’s some other actionable tips to make a Wi-Fi extender’s network more secure, hopefully limiting the chance for unauthorized people to access it:
- You can also hide the Wi-Fi extender’s network from within the settings, preventing it from broadcasting so nearby Wi-Fi users don’t even know it exists.
- Also make sure your extender is using the best wireless security protocol possible from within settings. WPA3 or WPA2-PSK are best; avoid the older WPA or WEP protocols
- Change your main router’s wireless password at regular intervals as well, since your extender automatically copies your router password. Make it long, strong and complex.
- Make sure also that the admin/settings username/password are strong and not easily guessable, as you don’t want unauthorized people gaining access to the extender’s settings and making their own changes to the network.
- If your extender is dual band (meaning it broadcasts both a 2.4 GHz and a 5 GHz network) disable the 5 GHz network from within the settings if you’re not using it. Honestly, most users don’t even need to have a 5 GHz band enabled, and the 2.4 GHz band will work fine and is better over distance anyway.
- Another good “nuclear” security measure is to simply factory reset the extender by pushing a pin into the reset hole, and reconfiguring it from scratch to kick all devices off and start over with new credentials and a hidden network. Can be useful if someone has taken over control of the settings and is doing silly things.
See our full article on Wi-Fi extender network security, for more detailed info on each of these tips, plus more.
