TP Link extenders tend to be pretty easy devices to configure, but what about changing settings on them once you’re up and running, like the username/password. Is it possible to do this?
This is possible, and assuming we are talking about the admin/settings username and password (what you use to log into the extender’s settings and change stuff), it’s actually quite easy.
Here are the quick steps:
- Connect to the extender
- Log into the admin panel
- Go to System Tools
- Go to Admin Account
- Confirm the old Username/Password
- Enter & confirm a new username/password
- Save settings and exit.
And it’s really that simple! Your extender now has a new set of credentials you need to enter to log into it’s settings panel. Wireless credentials can also sometimes be changed, and we’ll cover this further below.
Note – If you’re using a brand new extender for the first time and want to change the username/password away from the defaults listed on the sticker, don’t worry – the custom initial setup process you run through to connect the extender to your router always gives you the chance to do this, both for the admin and wireless credentials.
How To Change The Admin Username/Password
Let’s firstly cover if you want to change the admin/settings/configuration username and password. These are the credentials you enter to access the extender’s settings and make configuration changes.
All TP Link extenders have an option to do this within the settings panel, and it’s easy to find. Here are the general steps:
- Open any web browser on a device connected to the extender’s Wi-Fi network.
- Type in the default login URL of the extender (on the label) into the address bar. Common ones are:
-
- TP Link – http://tplinkrepeater.net
- Netgear – http://mywifiext.net
- Linksys – http://extender.linksys.com
- Wavlink – http://wifi.wavlink.com
-
- Enter the custom admin username/password you will have set yourself previously if you’ve configured the extender already (for first time users, use the default username/password on the label and run through the initial setup guide to set custom credentials).
- Once inside the extender’s admin/settings panel, go to System Tools, then Admin Account:
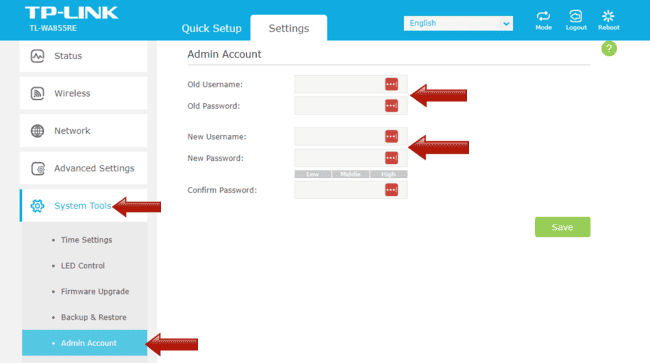
Then you just need to enter in and confirm the old username/password, then the new ones you want to use, and then click Save.
Your new username/password credentials are now active and will need entering from the next time you want to log in to the extender’s settings/admin panel.
How To Change The Wireless Username/Password
What about if you want to change the actual wireless password you use to connect to the extender’s network? Normally, your extender will default to copying your main router’s wireless password when it is manually set up by the user.
On my TP Link extender at least, there isn’t an option within the admin settings to quickly change the Wi-Fi password. You can change the admin/login password, but not the wireless one you use to access it’s network.
To see if you can change this, you need to re-configure the extender from scratch, either connecting it to your router again, or factory resetting it (see below) and running through the setup process all over again.
Log in to the extender’s admin panel, as shown above, and the go to Quick Setup at the top:
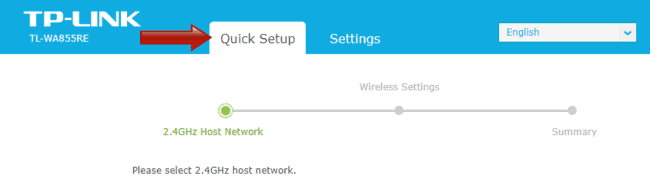
The extender will scan for nearby networks, and you need to find and connect to your main router again, and then run through the setup process again (if it doesn’t allow you to do this, factory reset it and start over – see next section).
During this setup process, there may be an option to customize the Wi-Fi password set so it’s different from your router, but this option is not available on all models. And you can definitely set a new username/SSID for the extender during setup. Wi-Fi extenders tend to clone the password of the router they’re capturing the signal from, and this can’t always be changed.
What If I’ve Forgotten/Don’t Know The Username and Password?
There can be complications with access credentials on Wi-Fi extenders. You might have set a custom username/password, but forgot what you set it to. Or you might have bought a second hand extender that’s still got old access credentials on it and you’ve no idea what they are. Or there’s a custom Wi-Fi password on it that you don’t even know, so you can’t even access the extender’s network to even try logging into the admin.
In these cases, the best option is to just factory reset the extender, which reverts all settings back to the defaults.
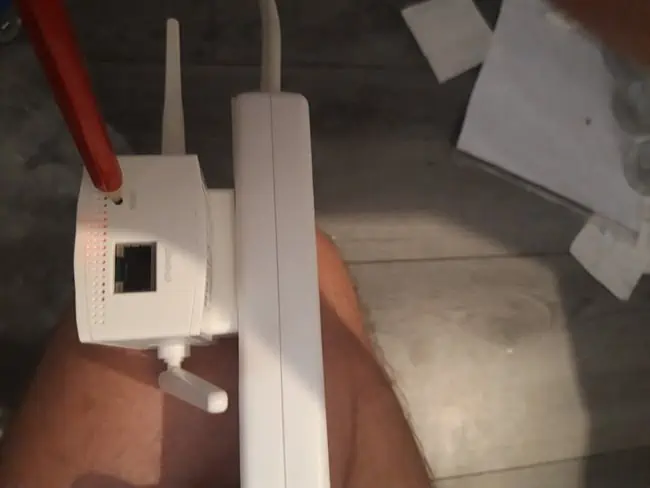
To do this, just insert a pin or other sharp object into the reset hole on the extender, and push in for a few seconds until the LED blinks or goes out:
Then wait a few minutes for everything to re-initialize.
This resets everything, including login credentials, back to the defaults listed on the sticker on the extender itself:
- Default SSID (network name)
- Default access/login/URL (eg. repeaterlogin.net)
- Username (often “admin” by default)
- Password (often “admin” by default)
Therefore, you can easily find the repeater on the network list again (it should have reverted back to it’s factory name like “TP-Link-Extender-680C” or similar), plus it’s an open network so you can just click and connect again without a password.
From there, enter the extender’s default login URL into a browser (often http://tplinkrepeater.net on these models), plus the username/password (often both “admin” by default) and then proceed through the initial setup process again, where you connect it to your router and set custom admin and wireless credentials all over again.
