This is where home networking needs simplifying and demystifying a little bit. When we look at the label/sticker on the back of a router, to users who don’t normally bother much with router settings, it can all look like a load of gibberish. There’s all these different codes/PINs/keys/password/SSIDs/usernames, plus 2.4 GHz, 5 GHz, WPS, and so on.
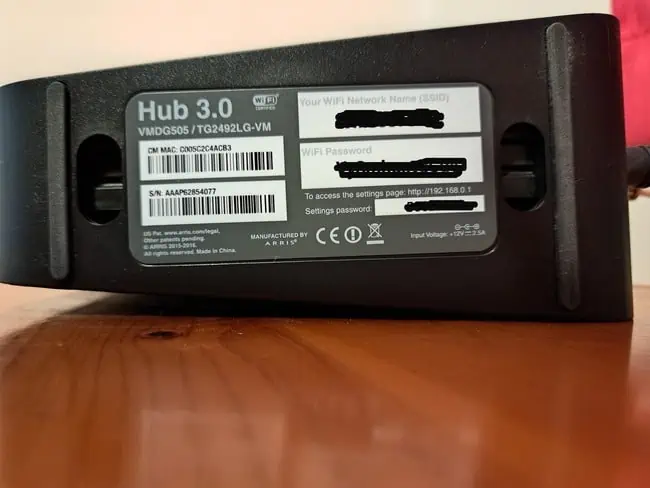
Here’s a typical view of what you might see:
What does it all mean? It can all seem a bit intimidating to non technical users, who just want to be able do a specific thing on their router/network, or just start using it, but don’t know how to interpret all this stuff they see on the label.
That’s what we’ll try and break down in simple terms in this guide. We’ll go through all these details you’ll typically find on router labels, explaining what they all mean, what their purpose is, and when you might need to use them.
Here’s a very quick summary answer:
- Wi-Fi username/SSID and password – needed to connect to the router’s network
- Login IP/username/password – needed to login to router settings.
- WPS Key/PIN – can be used to connect to the router without a password.
- 2.4 GHz/5 GHz details – dual band routers have two networks you can connect to.
- Model number – can be used to look up router details/manuals/help guides online.
- Serial number/barcode – can be used to identify router.
We’ll start with the two most important bits of information first – the Wi-Fi username/password and the router login details – as these are the credentials you’ll use most often.
Let’s get started.
Router Wi-Fi Network Credentials Explained
This is really the main thing you need to get initially connected to a router – the Wi-Fi username and password.
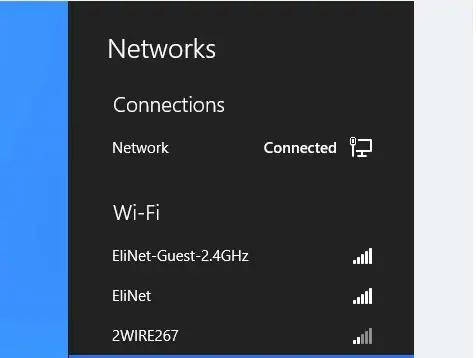
Wi-Fi/wireless/WLAN username – also sometimes called the Network name or SSID. This is the name of your router’s network that should show up (see here if it doesn’t) whenever you scan for nearby Wi-Fi networks in range on any device, something like this:
Also note that while on single band routers, there will only be one Wireless username/SSID, dual band routers also exist which will actually have TWO different sets of network credentials (two SSIDs), something like this:
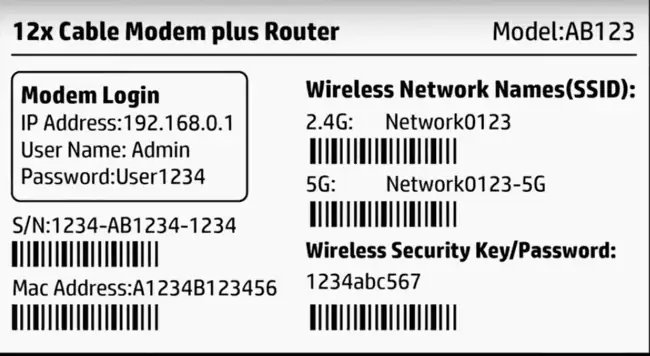
You’ll see a standard of 2.4 GHz set of credentials and also a 5/5 GHz/5G set of credentials – this is just the 2.4 GHz or 5 GHz Wi-Fi bands, and you can choose to connect to either (really, for most casual users, you don’t even need to worry about this – just connect to the standard 2.4 GHz band, and you’ll almost always be fine. Forget about 5 GHz Wi-Fi unless you have really specialized, high bandwidth needs).
And now let’s move on to the password which complements the Wi-Fi username/SSID:
2. Wi-Fi/wireless/WLAN password – Sometimes also called the Wi-Fi PIN/Key/Code or WPA PIN/Key/Code or WEP PIN/Key/Code. This is what you enter on your device after finding the SSID/network name on your device’s network list, to actually connect to the router’s Wi-Fi network. It can be all letters, all numbers, or a mix of the two, but it’s what you enter after you’ve found your router’s SSID on a network list, and as long as it’s entered correctly, this is what connects you to your router so you can actually start browsing the internet.
See this guide for help if you can’t seem to get the default Wi-Fi password to work, and you can’t connect to the router to start using it.
Router Configuration Login Credentials Explained
Now let’s move to the router settings/admin interface login details. This is separate and distinct from the Wi-Fi username/password covered above, and is what you actually use to enter the router’s settings/configuration/administration interface, to change settings on the router and the network.
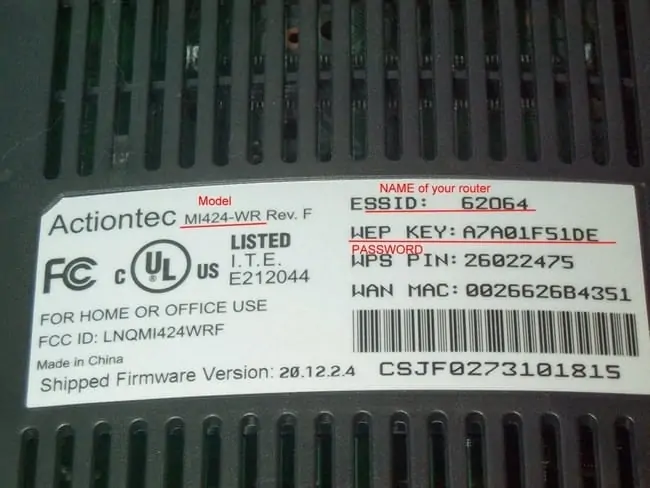
These are the circled details in the picture below:
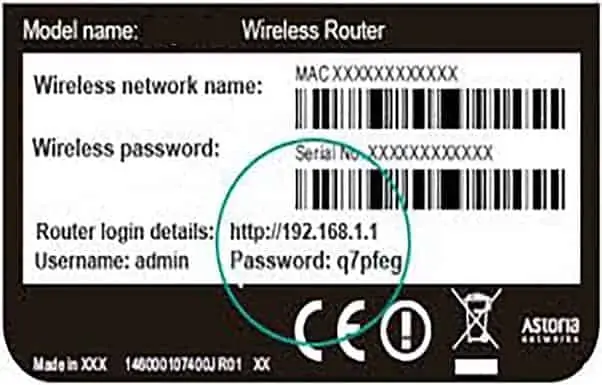
Let’s break down each aspect:
Router login details – Also sometimes called the Login URL/IP, Access URL/IP, Default Login, Default Access, (Default) IP Address, Default Gateway or Admin Login/Access. This is the URL you enter into any browser address bar once connected to the network (an important prior step) to begin the process of logging into the router settings. Most often 192.168.0.1, 192.168.1.1 or 192.168.1.254, but can be lots of other URLs as well in the x.x.x.x format, and can sometimes even be in a web address format (eg. http://routerlogin.net).
Username – Also sometimes called the Admin or User. Often “admin” by default but varies from router to router. Once you enter the correct router login URL, this is what you enter next along with the password covered below, to access router configuration.
Password – What you enter alongside the admin username to complete the router login process. Once you enter the correct login username/password, you should be in the router settings interface.
Sometimes, depending on the router model, not all these admin credentials will be present on the label. Sometimes, there will be only an admin/username, but no password. Other times there will be literally only a router access URL/IP, without even any admin/password required, to enter the settings.
What’s a WPS PIN/Key/Code? (Not on all routers)
Another supplementary credential sometimes found on the router label is a so-called WPS (Wi-Fi Protected Setup) Key or PIN. WPS is not available on all routers, but is a feature that allows you to connect to a router by using a simple button or PIN, without even needing to enter any Wi-Fi usernames or passwords.
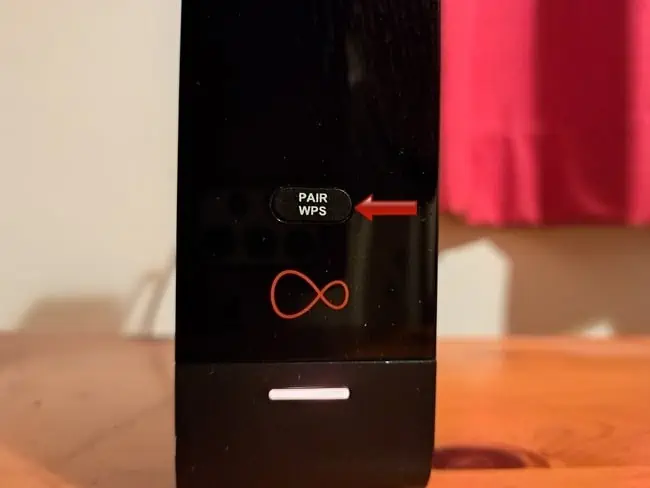
It’s designed to be a simple, no nonsense way of connecting to your router, and so you’ll sometimes also find either a WPS Button somewhere on your router:
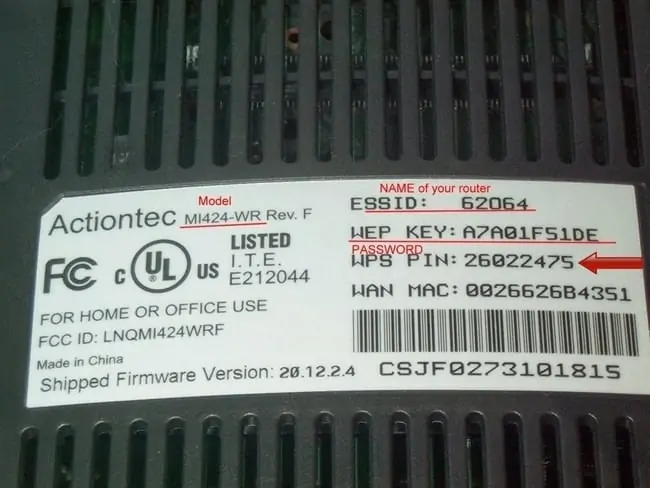
Or a WPS Key/PIN/Code on the router label:
Here’s how the two format would work:
- WPS Button – You’d press and hold the WPS button on your router, and the complete WPS setup on your device if it has this feature, or vice versa (initiate on your device, and then press WPS button on router within 20-30 seconds to complete the connection).
- WPS PIN/Code – You’d simply enter the WPS PIN into your device to quickly connect without needing any other credentials.
See our guide on finding and using WPS credentials on your router for more details. It’s not always available, but it’s an extra thing you’ll see on some router labels.
Other Information On Router Labels (Models, Barcodes, Serial Numbers etc)
Here’s some other information commonly found on router labels, perhaps less important for non technical users who just want to get online and forget about the rest, but here they are anyway:
Router Brand/Model – Just details the exact brand and model of the router (eg. TP Link Archer C9), since major manufacturers issue dozens or hundreds of different router models. Useful if you ever need customer support, or to look up help guides or user manuals online – you know which model to search for. The router model can also be found from the settings menu – see our guide for help on this.
Security Type/Protocol – Just displays the type of wireless encryption the router uses. Most modern routers should be using at least WPA-2 encryption now, but some older routers may use the less secure WEP encryption.
Serial/Product Number – Sometimes just abbreviated to S/N or P/N, plus a barcode. Another unique physical identifier which can again be useful for customer support/technical queries or returns.
MAC Addresses – Also sometimes called the WAN/Physical/External MAC Address – is an outward facing unique physical identifier that will be unique to every device in the world, including routers. This is how you could technically identify an exact router online, although in reality it’s quite difficult. Often displayed in the xx-xx-xx-xx-xx-xx format, and will be totally unique to that router.
Shipped Firmware Version – Details the version of the firmware pre-loaded in the router when it ships new, so you can check whether you need to update the router from it’s settings. If you ever factory reset your router, the firmware will also revert to this version until updated again. Also sometimes just listed as Version/Vers. x.x.
Other regulatory/legal information – Depending on the country the router is made/issued in, there may be some other codes, like FCC codes or regulation codes (confirmation it’s passed certain safety/regulation requirements). Country of manufacture is also often displayed. Almost all users don’t even need to worry about this.
How To Connect To A Router’s Network
OK, so now we’ve translated all the details often found on a router sticker, how do you actually USE all this stuff to connect to the router and start accessing the internet through it?
As far as connecting to a router, you’ve got 3 main options:
- Cable – Plug your device into one of the router’s ethernet ports (don’t even need any of the stuff on the label for this – just plug an ethernet/network cable into one of the LAN ports on the back of the router and you’re connected and good to go).
- Wi-Fi network – Find your router’s SSID/network name on your device’s network scan/list, and enter the Wi-Fi password to connect.
- WPS PIN/Key – Use WPS instead of SSID/password to connect quicker. See here for this option.
The Wi-Fi/wireless network way is most often used, so we’ll cover this one:
Step #1 – Note down your router’s SSID/Network name/Wireless name on the router label (eg. Comcast45678), then go to your device’s Wi-Fi settings and load up the Available Networks/Scan/Find networks feature. A list of networks in range should appear, and your router should be in that list, as long as it’s network is not hidden:
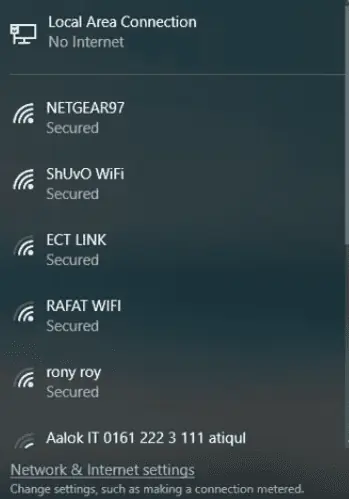
Click on your router’s SSID/network, then….
Step #2 – A password box should come up. Enter your router’s Wireless password/key/PIN/code as listed on the router label. As long as it’s entered correctly and hasn’t been changed, this should connect you to the router’s wireless network.
Then, as long as your internet service is active and working, you should be ready to access the internet via this wireless connection to your router.
How Do You Access The Router Settings/Configuration?
Once you’re connected to the router either by cable or Wi-Fi, you are then also able to connect to the router settings/admin panel as well if you want, to change network settings.
Note though, you MUST first be connected to the router’s network first, to then be able to access the settings. This is a point often missed by some users, who type in the usual 192.168.x.x login and wonder why it doesn’t work, when they aren’t even connected to the router.
You don’t need to be fully online, but you do need to be connected to the router by cable or Wi-Fi, before you can access the router settings.
But assuming, you have followed the steps in the above section and have this connection, here’s how you do this:
- Open up any browser on any device already connected to the router’s network.
- Enter in the login URL/IP/Default Access listed on the router label (eg. 192.168.0.1) into a browser address bar.
- Enter the login/admin username/password found on the router label, into the boxes that appear.
- You should now be in the router settings interface.
You know when you get the correct login URL/IP, because the username/password boxes appear:
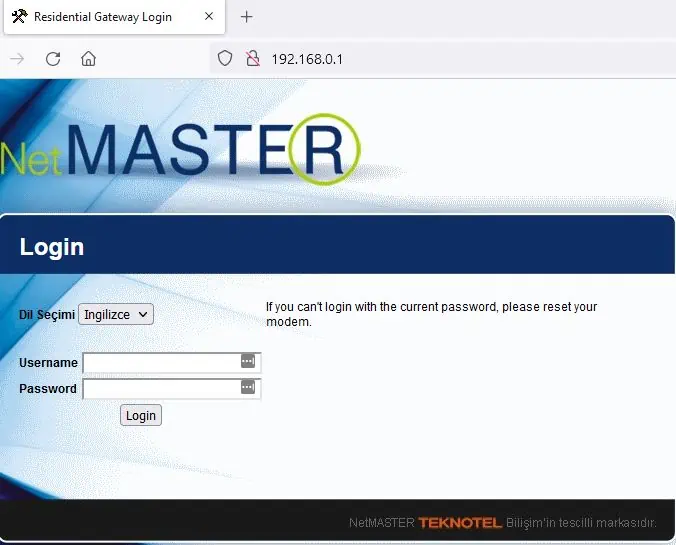
However, as with wireless credentials, these details can be changed, so the defaults listed on the label don’t work anymore.
Here are some helps guides with this:
- Help guide if the usual router login 192.168.x.x doesn’t work.
- How to find router login URL/IP (different methods)
- Help if the default router login username/password doesn’t work.
- See here for our full help guide if you’re still struggling to access your router settings/configuration page.
- See here for factory resetting your router to restore default login/Wi-Fi credentials as listed on the label.